Tuesday, June 24, 2014

Play Makeup DIY

It was my sweet little niece's 2nd birthday this month and I wanted to make her something she would love.  She is a girly-girl and loves to watch her mom, grandma, and auntie put on makeup.  I decided she needs her own set of makeup.

What you will need for this project:
  • Empty makeup containers (you can either use old/unwanted makeup or buy some at the dollar store)
  • Nail polish in a variety of colors
  • Makeup brushes (I found a set at the dollar store)
  • Compact mirror (another dollar store find)
  • Small bag (you could use one of the free ones you get from the department store, one from the dollar store, or you could make one like I did)
First you need to clean out any makeup remnants from your containers.  I used a butter knife to scrape out the makeup and then soaked the containers in soapy water.  Gather up several colors of nail polish that would be lovely eye shadow colors in some long forgotten decade (I really do not wear any of these colors on my own face but they certainly look pretty):


You will need to pour the polish into the different sections of the eyeshadow/blush compact.  Fill them all the way to the top because they will shrink down once dry.  Hide the makeup somewhere cats and children can't get to it and let it sit with the lid open for a day or two until completely dry.

(See, I told you it shrinks!)

I got these really cute brushes from the dollar store and wanted to spice them up a little with some washi tape on the handles:


I had a favorite polish that got goopy and was no longer useable so I decided to donate it to the makeup set.  I just poured out the rest of the yucky old polish and let it sit with the cap off for a couple of days.  I cleaned the brush with nail polish remover:


I used some fabric from my scrap pile and made a darling little bag using this pattern:


This gift was a huge hit!  My niece loves to look at herself in the mirror and puts "makuk" on herself and anyone nearby including daddy and the kitties!

Happy Birthday Sweet Girl!


Wednesday, May 7, 2014

Play Kitchen and Food DIY

 (photo collage courtesy of Smart School House)
 I have seen some really adorable play kitchens online lately.  Every time I see someone take an ugly, old nightstand and turn it into a sweet little stove top I get so excited!  I loved the idea of making one for my nieces to play with when they come and visit but I did not want to have a great big toy in the middle of my house when they are not here.  I decided to make a smaller stove top that would be easy to store in a closet or cupboard.  As always, I wanted to spend as little as possible but still have a cute toy my nieces would love.  I had already purchased a "Melissa & Doug" town block set for the girls to play with.  The Melissa & Doug toys sometimes come packaged in a wooden tray.  I realized the little wooden tray they came in would make a perfect stove top.  I started out by spray painting the tray a pretty green color I had left over from another project.  I found some wooden wheels and axle pegs at Hobby Lobby and spray painted them silver.  I drilled two holes in my tray for the axles to go through and attached my cute little knobs with some wood glue:


I then took a piece of cork board and covered it in some fabric I got from the scrap bin at my favorite quilt shop.  I attached the fabric to the cork board with some 3M spray adhesive.  I then took the cork board and screwed it into the wooden tray.  I made sure the screws were long enough to join the cork board and the tray but not long enough to come through the inside of the tray and scratch and little hands:


Next I had my shop teacher friend make me a little shelf from some scrap wood he had lying around and glued that to the back of my stove.  I screwed in some cup hooks for hanging kitchen utensils:


I got these sweet little buttons and small wooden barrels from Hobby Lobby and thought they would make great salt and pepper shakers:


I am planning on painting them blue when I find the right color of paint and then I will super glue the buttons on top.  I think they are just so cute on their little shelf!


I got two round wooden plaque bases from Hobby Lobby, painted them silver, and glued them to the stove top:


I got this little bamboo cutting board from TJ Maxx, it came in a set with a larger one that I use in my real kitchen.  I decided not to glue it down in case my nieces want to move it.


I found the cutest set of pans and utensils from Kmart the brand name is My First Kenmore.  They were the perfect size and color for my little stove top:


Now all I needed was some food.  I lucked out one day at the thrift store and found a stack of felt for really cheap.  I decided I needed more colors and bought a variety package of felt from Amazon.  I found some great tutorials for making felt food online and had the best time making goodies to fill my kitchen.  I love breakfast foods, so I started out by making a fried egg, bacon, and a pancake:


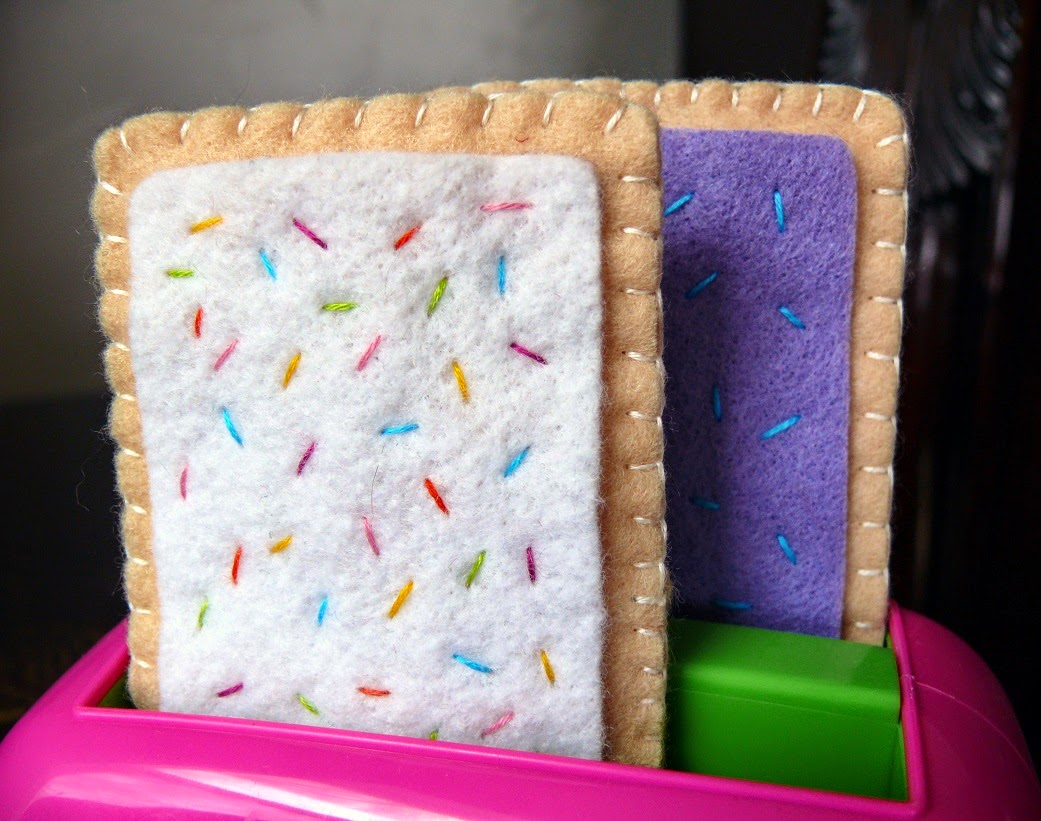
I just love the way these pop tarts turned out:


Now, on to lunch foods... I made a sandwich complete with lettuce, bread, cheese, lunch meat, and pickles.  I just made up the last three items as I went along but there are tons of great tutorials if you google "felt food."


One of my favorite pieces of felt food was the bow tie pasta:


I have no idea if my nieces will like sushi and fortune cookies, but their autie and uncle do:


This little play kitchen ended up being exactly what I wanted.  It is small enough I can stash it away in a cupboard when I do not have tiny visitors.  It also cost very little considering I used scraps, thrifted supplies, and tid-bits that were just lying around the house. 


I have two baby nephews on their way any day now.  I can hardly wait to make some cute toys for my little guys!

Thursday, May 1, 2014

Travel Jewelry Case DIY

I love making hand-made gifts for the special people in my life.  This little travel jewelry case makes a wonderful Mother's Day gift.  Make one for your mom, grandma, sister, or friend.  Really though, who wouldn't adore getting one of these pretty cases for their birthday or for Christmas?


Supplies you will need:
  • Cotton fabric (I used three coordinating fabrics)
  • Thread
  • Quilt batting
  • Pillow batting (fiber fill)
  • Snap
  • Lace
  • Ribbon
  • Velcro
  • Button
Let me tell you some of my tricks for getting craft supplies on the cheap.  I go to the thrift store and buy throw pillows for between $.50 and 2.00 and use the batting for small projects like this one.  I also always check out the crafting aisle at the thrift store for things like zippers, snaps, buttons, Velcro, trim, lace, and ribbons.  It is so exciting to find brand new items for much cheaper than you can buy them at the fabric store.  I keep all of the fabric and batting scraps from my other projects and save them for things like this.  When I visit my favorite quilt shop, Suppose I always like to look through their scrap pile and get gorgeous fabrics for next to nothing. 

Cutting your fabric:
  • Cut one piece of fabric 12x7 inches (this is my gray and white polka dot fabric)
  • Cut one piece of fabric 7x7 inches for the smaller pocket (this is my orange fabric)
  • Cut one piece of fabric 8x7 inches for the Velcro pocket (this is also my orange fabric)
  • Cut one piece of fabric 2.5x7 inches for the ring holder (again my orange fabric)
  • Cut one piece of fabric 8x7 inches for the outside of the case (this is my orange, white, and gray floral fabric)
  • Cut one piece of fabric 4.5x7 inches for the outside of the case (this is my orange, white, and gray floral fabric)
  • Cut one piece of lace 5.5 inches long 
 Assembling your case: 
(all seam allowances are 1/4 inch)

Fold the smaller pocket in half, wrong sides together to make a 3.5x 7 inch square and press:


Fold in half again and press to make a crease to sew along.  Lay the pocket fabric on one end of the large (12x7 inch) piece of fabric with the folded end facing the middle.  Sew through all layers of the fabric, making two small pockets.  I feel like this sounds confusing so please refer to the photo below:


Fold the larger pocket in half, wrong sides together to make a 4x7 inch square and press.  Sew your soft piece of Velcro to the folded edge of this pocket:


Sew the hard piece of Velcro to the other end of the large (12x7 inch) piece of fabric.  I did not take a photo of this step but look at the picture below for help:


Fold the 2.5x7 ring holder fabric in half with right sides together and sew down the long side:


Sew across one of the short ends of the ring holder:


Turn right-side out:


Attach your snap to the ring holder and the large inside piece of fabric:


I just love these snaps, they remind me of the cowboy shirts my grandpa used to wear.  I found two packages of them at the thrift store for $.50!


Fill the ring holder with fiber fill and attach to the large inside piece of fabric.  Attach the lace to the inside piece of fabric:


Fold the 4.5x7 inch piece of fabric in half and crease or make a mark.  I used a piece of double-sided tape to hold my ribbon in place.  This ribbon will wrap around the button to hold your case closed.  I did not include a length on this because it will depend on the size of button you choose and where you place the button:


Lay the 8x7 inch piece of fabric on top of the 4.5x7 inch fabric with right-sides together and sew them together:


Attach your button to the outer piece of fabric.  Sandwich a piece of quilt batting between the outer and inner pieces and pin in place:


Get excited because you are almost finished!  Now you need to bind your jewelry case.  You can use bias tape or bind with one of your three coordinating fabrics.  Follow this awesome video tutorial for help with binding.  Here is another great quilt binding tutorial.  


I ended up making one of these lovely cases for several family members (and of course, one for me).  They are so fun and easy to make and I love that I can use my gorgeous left-over fabric.


Who would you make one of these pretty cases for?


Saturday, April 19, 2014

Closet Make-Over and Cozy Wall Art Review

When we bought our home a few years ago there were so many things I fell in love with right away.  My closet however, was not one of them.  At some point in the history of our home the lath and plaster walls in several of the rooms were replaced with drywall.  Someone had started the process of drywalling the closet but they did not quite finish.  I forgot to get a good before picture, so these will have to do:


I am not a drywaller but luckily the employees at my hardware store are very helpful and directed me to all the right supplies.  I used Google and YouTube to figure out how to finish the drywall.  Then I had the little matter of the maroon shag carpet to deal with.  I pulled up the carpet and removed all the tack strips only to find the hardwood underneath was in pretty sorry shape.  I decided to paint the hardwood and turned to good old Google for help.  My closet was really starting to take shape now:


My closet is not large so I needed to do some things to maximize the space I have.  I went through everything and made a pile of clothes and shoes that either do not fit well or I have not worn in the past year and gave those items away.  I decided to organize my clothes by color and it has made my life so much better!  I used to have my clothes organized by type of item (sweaters, cardigans, blouses...) but when I wanted to find a particular sweater I still had to look through all my sweaters to find it.  I also made sure everything was hanging in the same direction.  Now when I am looking through my closet the fronts of the shirts are always facing me.  I followed a great tutorial online to make my cute bra organizer.

I scored this shoe rack for only five dollars from my local thrift store, removed one of the shelves to make room for tall boots, and spray painted it teal:


I did not like having my boots flop over and wanted a cheap solution to that problem.  I saw on another blog that you could use pool noodles to make your boots stand up.  I found these cute flowered shaped noodles at the dollar store, cut them to the right height, and put them in my boots:


I also got this cute tote at TJ Maxx to hold all of my purses:


I loved how bright, clean, and organized my closet felt but it was missing something.  My closet is under the eaves of the roof so the ceiling is slanted and I was not sure what to do with it.  I had thought about putting wall paper up or maybe adding a cork board.  

Then I was contacted by a company called CozyWallArt.com and was given the opportunity to review one of their wall decals.  I checked out their website and found this lovely cherry blossom branch and knew it would be the perfect finishing touch for my closet. 

 Let me start off by saying Cozy Wall Art has wonderful customer service.  I was having a hard time deciding what colors to go with on my wall decal.  I emailed customer service and received a very quick reply giving me advice for color choices.  I was even sent extra flowers so I could make sure the color was right.  I love Etsy companies because they always manage to make getting a package even more exciting.  My wall sticker came with this cute little baggie full of goodies, instructions, an applicator, and an extra flower decal:


 I have never applied vinyl decals to my walls before, but it was actually very easy.  I followed the directions included with the sticker and did not run into any problems.  The branch came in three pieces which were clearly marked to help with installing them correctly: 


I used the picture included with the instructions and a picture I found online to help me figure out where to place the flowers:


I think my closet looks amazing now!  The wall decal adds such a beautiful touch of whimsy to the room.  I am tempted to leave my closet door open all the time!


Now I need to make-over my husband's closet.  I just have to decide which decal to put on the ceiling... which one would you choose?
Related Posts Plugin for WordPress, Blogger...