Sunday, April 10, 2011

Alarm Clock + Spray Paint

Well, I have certainly been neglectful with my posting lately! I have been working on projects but I haven't finished many. I will share them just as soon as I get my butt in gear.

I have been in desperate need of a new alarm clock so I can stop using my cell phone's alarm ( I love my friends and family, but unless their car is on fire or they're having a baby or something, I don't want to hear from them after bedtime). I went out looking for the perfect alarm clock and couldn't find it. Isn't that how it always goes? I did however find this little guy:
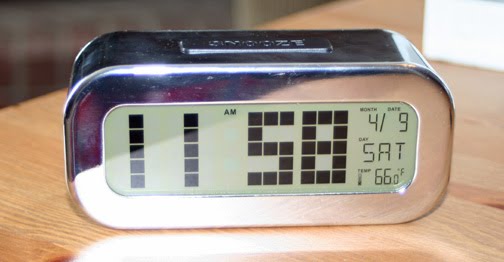

I liked the shape and size of it and I thought the digits were kind of cute, all made out of squares like that. I didn't particularly like the shiny chrome finish (it had finger prints galore after the first day) and I really didn't like the big black snooze button that actually says SNOOZE on it. So I popped off the metal case and went through my box of spray paints and found the perfect color:


They make spray paint specifically for plastics if you want to try this on a plastic clock. Now on to the SNOOZE button issue. I just painted the button with white acrylic paint:


Then I went scrounging through my jar of fabric scraps and found this darling bit:


I attached the fabric to the snooze button using 3M Super 77 spray adhesive. Then I just crammed the innards back in the case (it actually took a bit of finessing to get the clock put back together). And here it is, all pink and lovely:


Where I like to link:


Thursday, March 3, 2011

We have a winner...

Thanks to everyone who entered our giveaway! We used random.org to select a winner and the lucky winner is...


Comment #35 bluvs2shop who said : "I signed up to follow your blog! Love your ideas and I'm starting to work on the VW Bus Quilt!!" (You didn't leave an email, so please send me a message so I can get your coupon code to you. Another winner will be selected on March 7th if I haven't heard from you.)

Also, a big thanks to CSN for the fun giveaway!

Wednesday, February 23, 2011

CSN Stores Giveaway!!

We are so happy to be hosting another CSN giveaway. One of our lovely readers will receive 30 dollars in credit to spend at one of CSN's many online stores!

What's so great about CSN is they have some of just about everything. Are you in the market for new bedding, shoes, a car seat for your little one? They have all that. They also have beautiful furniture like computer desks for home offices, upholstered headboards, and much more.

How to Enter:

1. The giveaway is open to US and Canadian residents.
2. Leave a comment telling me what you would like to spend the $30 on (you don't actually have to spend your winnings on that item).
3. Facebooking or blogging about this giveaway will give you an extra entry, but you must leave an extra comment for each, telling me you've done so in order for it to count as an extra entry.
4. It would be nice if you decided to follow us, but we won't make you...there is an extra entry in it for you though (please leave yet another comment telling us you already were a follower or that you are a new follower if that is the case).
5. One more chance to win, grab our button for your blog and leave another comment telling us you did so.
6. Leave me your e-mail address or make sure it is visible on your blog so in the event that you win this giveaway I can contact you.

Entries will be accepted until 11:59 pm MST on March 2, 2011. A winner will be chosen at random. I will notify the winner by March 3, 2011 via email (please respond within 48 hours). The winner will also be announced here on our blog. Good luck!!

Saturday, February 12, 2011

Homemade Silver Polish

If you read my Valentine banner post, you know I am having some friends over for a Valentine's dinner. We have lived in our house for three years now and have only used our dinning room twice, both times were Thanksgiving dinner. So, I'm trying to say I'm pretty excited to have a little get together and use the room.
I don't have a nice set of silverware. I have found several sets I wouldn't mind owning but I don't want to shell out the money for them. My solution was to buy silverware as I come across it at thrift and antique stores. I paid between ten cents to two dollars a piece for my silverware. The only problem now is that every piece is pretty tarnished.
I remember using a rag to polish my grandma's flatware and not really digging all that work. I came across this super easy and quick way to clean/polish silverware:

Homemade Silver Cleaner/Polish:
  • 2 tablespoons baking soda
  • 1 tablespoon salt
  • aluminum foil
  • glass dish
  • hot water

Line a glass dish with aluminum foil and add your silverware. Be sure it touches as much of the foil as possible because the reaction to the foil is what removes the tarnish. Sprinkle the salt and baking soda over the silverware.

Now, carefully pour boiling water over your silverware, being sure all items are completely submerged. This part is fun because it gets all bubbly and fizzy. Your kitchen should now smell a bit like a sulfur hot pot (my husband walked in and blamed the smell on the dog). Let your mixture sit for 30 minutes.

Then pour out the water, rinse off your flatware, rub it a little with a clean cloth and...

Aren't you impressed?! It looks amazing and I didn't have to rub it with a cloth all day long!

I had no idea this spoon was engraved until I cleaned off all the tarnish. So cool.


Now I'm all ready for my dinner guests!

Saturday, February 5, 2011

Valentine Crayon Hearts

My good friend Janette and her sweet little girls made these super cute crayon hearts with me.


We found the tutorial over at Martha Stewart's website and knew we had to make them.
This was a very inexpensive, yet time-consuming project. The girls seemed to love it though...they know their way around a box of crayolas! They got really creative with color combinations, adding a really pretty blue that I would have never thought to add to the mix. They also got creative with the shapes they cut out, making double and triple hearts. I played it safe and just cut out varying sizes of hearts.
We basically followed Martha's tutorial, except we used paper grocery bags rather than Kraft paper around the wax paper (mainly because I don't know what "kraft" paper is). I attached my hearts to baker's twine with a dab of super glue.
If you are looking for a fun project to do with your kids, this is a great one.

Monday, January 31, 2011

Button Napkin Ring

This sweet little project is super cheap and easy (my favorite kind of project!)
All you need is:
12 inches of pretty ribbon
Button with a shank (hole on the back)
Lighter

First, thread the ribbon through the shank of the button. Next, tie the ribbon in a knot (try to pull the knot as tight as you can).


Then, cut the ends of the ribbon as close to the knot as you can and burn the raw edge with your lighter. Put your napkin ring around a rolled up cloth napkin.


Hook the loop of the ribbon around the button...and TA-DA:

A lovely and cheap napkin ring for your romantic Valentine's day dinner.

Sunday, January 23, 2011

Valentine Banner


I will be hosting a Valentine's dinner for a couple of friends so I wanted to make our dinning room look a little more festive. I found this adorable banner and decided I need one for my house. I mainly used K and Company products. Most of the papers I used were from this paper pack:

Those cute little Victorian cut-outs came from this:

These pleated flowers are really easy to make if you follow the directions over here...

I used baker's twine to string all of the elements together. I wanted them to stay put, so rather than hole-punching the items, I used a long sharp needle and just threaded them on like I was sewing.


I love the way my banner turned out and can't wait for my friends to see it.
Related Posts Plugin for WordPress, Blogger...